When DNS goes bad
This year someone in China misconfigured something which effectively exported China’s main method of implementing blocks (man in the middle DNS spoofing) semi globally over the Global Crossing backbone for the last few weeks.
Effectively, China’s blocking, went global (for certain providers).
I was reading a post up at Carsonified (http://carsonified.com/blog/dev/bulletproof-backups-for-mysql/), which talked about MySQL backups.
While he slightly re-invents the wheel, its fairly similar to what we do over at Computer Solutions as a solution for Backup.
How do we do it?
As its been a while since I did any hardware stuff (other than some dabbling in Arduino), I decided I would try and resuscitate a bricked 941n router. I had given it to the staff to fiddle with, but they needed a push in the right direction for where to start.
First I needed tools.
Luckily China is pretty awesome when it comes to getting electronic bits and pieces so most of what I needed was a mere Taobao away.
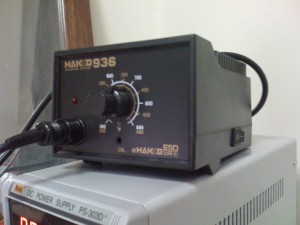
As the crap soldering irons in the office weren’t going to hack it, my first purchase was a decent soldering iron.
I took a look at the Wellers (which I used in a previous lifetime), and decided that the pricing was a little too steep for my liking!
Taobao had plenty of cough, cough ‘clone’ Hako 936’s though, so I bought one of those, 10 tips and some solder for a little less than 200RMB delivered to the office.
I could have gone to buy it over in the electronics mall over in Beijing lu, but seriously, Taobao is easier.
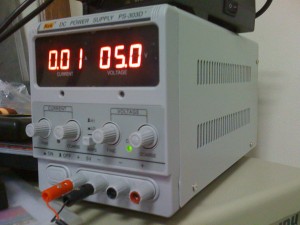
While I was at it, I also orderd a Rek DC power supply, and some JTAG cables.
The PSU isn’t totally useful for router hacking, but we do have a lot of people that forget to bring laptop chargers with them, so it will come in handy for that. Looks pretty nifty too.
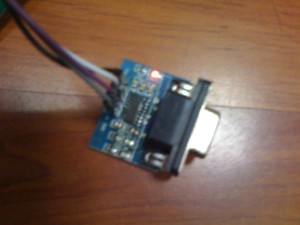
Next up was a serial to ttl adaptor, as the TP-Link uses TTL voltage apparently, and I needed to convert into standard pc serial.
I bought 2 adaptors, one USB one, with rather crappily made headers, and a rather nicer serial one with pin’s.
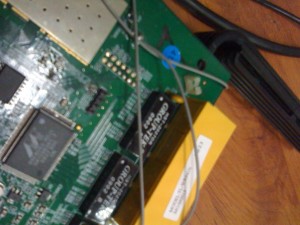
As I’m rather crap at soldering, I totally expected things to bork something up, but amazingly I got the headers installed relatively easily, and even managed to bridge pad (R356) to enable serial first go (as per the wiki).
I plugged in my serial adaptor to the computer, and powered up the router.
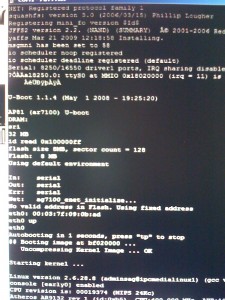
Suprisingly everything worked first time around, and I got some serial output in HyperTerminal.
A few nanoseconds later I got to experience again how much I hated HyperTerminal.
Grumble cpu usage grumble frozen input grumble mutter,… and installed PuttyTel instead.
Putty also seems to autodetect the kernel speed nicely (as boot changes from 9600 to 115,200baud), which is a bonus.
I still need to time it right so I can catch the u-boot in time to stop it, and, I also still need to reflash it, but the hard part is done!
Total cost – roughly 250RMB for parts (soldering iron, tips, serial ttl adaptor, pin headers, jtag stuff etc), plus about an hour of time, most of which emcompassed clearing my desk enough so I could solder 🙂
I’m all setup for more journeys into equipment though, and I can now completely recover borked equipment handily.
Useful pages:
http://wiki.openwrt.org/inbox/tp-link.tl-wr941nd (Pinouts)
https://forum.openwrt.org/viewtopic.php?id=18354&p=1 (Thread on TL-WR941 hacking)
Firmware files:
http://downloads.openwrt.org/snapshots/trunk/ar71xx/
Taobao shopping:
http://item.taobao.com/auction/item_detail-db1-3fbe7be878a7aa35dd4ec1e4260113e8.jhtml (RS232 TTL)
http://item.taobao.com/auction/item_detail-db2-3c9886e66da40119a6c72fe03c4b8d38.jhtml (Hakko 936 + tips)
http://item.taobao.com/auction/item_detail-0db1-4fbc4e80f96ae37dbd34b9cb466aa642.jhtml?cm_cat=0 (Wiggler JTAG)
Currently I have an iPhone (ancient 2G), and have just bought a Dell Mini3i (600RMB with an 18month contract @ China Telecom), as I donated my 3G iPhone to one of the extended family back home.
The Mini3i runs an Android variant called OPhone.
The 3i is a little underwhelming software wise.
Its quite crap at the moment as its sitting on Android 1.0 (OPhone 1.0), but for all intents and purposes Android = Ophone its pretty much the same underneath.
There are a bunch of similar phones to this – the Lenovo O1, LG GW880, Motorola something or other (can’t be hassled to go look) etc.
While I haven’t rooted mine just yet, I have been playing around, and reading the Chinese forums.
Boot loader appears to be similar on all the devices – its made by BORQ’s in Beijing, and appears to be quite basic.
Motorola and O1 seem to have the best support for now, the main problem in the Chinese forums is people bitching about being stuck on older versions.
Some are running 1.6, most on 1.5, and the unlucky few 1.0 “Ophone”
2.0 and 2.1 has yet to hit the mainstream here.
There are people with N1/G5’s (Nexus 1 / HTC G5) on 2.1 though (yes, thats you in Beijing Tom!), pretty much any phone is available, although anything with wifi is essentially grey import from overseas (HK mostly)
Back to the phone –
Thankfully you can install any apps as apk’s, no need to hack for that – so its fairly easy to get info on the innards.
RootExplorer is your friend 🙂
RootExplorer also allows you to remount partitions r/w, so root access is fairly easy too. There are precompiled su binaries for 1.5 out there, although I’ve yet to do my phone.
The Dell mini3 is running on a Marvell Tabor. Fast chip, nice touchscreen, decent resolution, just crap on 1.0.
Firmware files for most of the “ophones” (except motorola) are mff files.
The mff files appear to just be compressed images with instructions for how to write the various partitions out.
eg the Lenovo O1 mff has this in the “mff” zip
2010/02/25 10:53 147,111,936 factory_CHERRY.fbf
2010/02/25 10:53 249 factory_CHERRY.mff.mlt
2010/02/25 10:53 364 JADE_EVB_RawNANDx16.ini
2010/02/25 10:53 327 magic_fbf.ini
2010/02/25 10:53 2,692 magic_fbf_inner.ini
2010/02/25 10:53 10,236,719 mfw.pac
2010/02/25 10:53 54,180 MHLV_NTDKB_h.bin
2010/02/25 10:53 176 MHLV_NTDKB_TIM.bin
2010/02/25 10:53 858 NTIM_td.ini
magic_fbf_inner.ini has the layout
[INTEL_FLASH_DEVICE_INPUT_FILE]
Number_of_Images=24
[IMAGE_HEADER_0]
Start_Address=0x240000
Image_Length=0x40000
EraseBlocks=1
WriteImage=0
VerifyWrite=0
[IMAGE_HEADER_1]
Start_Address=0x6900000
Image_Length=0xf00000
EraseBlocks=1
WriteImage=0
VerifyWrite=0
(etc)
Different phones have different firmware writing software, the Motorola’s are using RSDLite, LG – SML_OMS, CTHall, others something homegrown called Firebolt, which is written by BORQS. I have all the firmware tools already, despite the Ophone8 forums lack of courtesy in sharing, grrr.
Most firmware tools appear similar though functionality wise.
Haven’t played around inside the phone yet to see if its easy to get jtag access, although that was mostly because i couldn’t work out how to remove the top part without breaking it.
If anyone wants more info, or a firmware dump let me know.
Hopefully there is some interest out there in the English speaking world for these!
Occasionally even in a well maintained system, qmail has issues.
One semi-common issue I get to see, is when a server we send mail to doesn’t timeout. This ties up an outgoing mail slot. Over a period of time, this can lead to issues where the whole outgoing or incoming queue is sitting doing nothing, as every connection is tied up by ‘tarpitted’ connections.
Ideally Qmail should be able to cope with these. There are settings in qmail to control how long a connection takes, and how long it should wait for. These settings are covered in the following files (usually set in /var/qmail/control)
Although most of my friends are using 3G/s now, I do get the odd 2G phone to play with.
Today I had another crack at enabling MMS on a 2G. For some reason not much documentation, and too much misinformation out there on the net.
Guaranteed working instructions for China Mobile users below:
Note #1 – this is for 2G iPhones only. 3G and newer phones, skip to the MMS settings at the bottom of the post, and put those in Settings / General / Network / Cellular Data Network…
Note #2 – 2G users – if you used BlackRa1n to jailbreak, this will not work either, and will b0rk wireless. Use PwnageTool, and create a 3.1.3 jailbroken / boot neutered (carrier unlock) firmware, install that first, then continue.
iPhone 2G users –
Install 3.1.3
Jailbreak with usual steps.
Add cydia.ifoneguide.nl in Cydia / Sources
Wait a bazillion years for cydia to timeout with the various blocked in China repositories.
Click Search
Download Activate 2G MMS
Reboot
Normally we’d be done, however the MMS settings won’t let us save a diffferent MMS and GPRS name, so we need to install a specific IPCC (iPhone Carrier Setting file) for China Telecom.
As China Telecom is (at time of writing) not an official iPhone supplier, they don’t have an IPCC file, so we need to roll our own.
Here’s one I found earlier – ChinaMobileCarrierSettingsWithMMS.zip
Download that, unzip, and throw on the desktop.
We’ll need to tell iTunes that its ok to use the IPCC file first, so close iTunes.
Now head off to terminal (or a DOS window for those on Windows), then paste this in.
Mac users:
defaults write com.apple.iTunes carrier-testing -bool TRUE
Windows users:
(32 bit)
“C:\Program Files\iTunes\iTunes.exe” /setPrefInt carrier-testing 1
(64 bit)
“C:\Program Files (x86)\iTunes\iTunes.exe” /setPrefInt carrier-testing 1
Done?
Ok, now open iTunes again, connect the phone if its not connected, and..
Mac Users:
Press + hold down Alt(option), and Click “Update”
Windows Users:
Press + hold down shift, then Click “Update”
iTunes will prompt you for a file.
Choose the IPCC file you downloaded.
Sync the phone.
Finally… shut the phone off again.
Once you power up again, you should be able to send/ receive MMS!
If its not working for you, check that the settings are in there –
Settings / General / Network / Cellular Data Network
(anything not listed below should be empty)
Cellular Data
APN -> cmnet
MMS
APN -> cmwap
MMSC -> http://mmsc.monternet.com
MMS Proxy -> 10.0.0.172
MMS Max Message Size -> 300172
Tested, and working on lots of 2g iPhones.
Noticed that our incoming TLS connection queue was a little high – running at 60 concurrent connections for an hour or so.
A check of the queue revealed that all the connections were coming from a single IP – and were tying up the queue, making it a denial of service attack. This one ip address was connecting and reconnecting multiple times, hogging up all the connections.
Read more »
UPDATED May 5 2010
Note: I don’t personally own an N310. I don’t have access to one either, as the owner of this one went back to the States with it.
Updates to this page are mostly from the comments people have made. When I can assist I have / will, but as I don’t own an actual N310, I rely on you for feedback!
One of my friends brought round a notebook for me to Hackintosh yesterday. Unlike the usual god no… kind of options I get given, this is actually a nice machine.
This one is almost as Mac friendly as my current Nano sized Hackintosh (aka Loz’s Hackbook Nano)
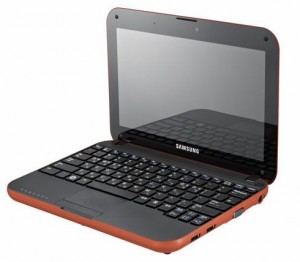
I present the next best thing in Mini Mac’s (until the will it? won’t it? Mac Tablet comes out! (ok, so it came out already, and its a bit meh..) ) – The Samsung N310
The Samsung is a generic Atom based Netbook with the following hardware:
CPU Intel Atom N270, 1600 Mhz
Chipset Intel 82945GSE Graphics Controller
Graphics Card Intel GMA 950
Audio Realtek ALC272
Wifi Atheros AR5007EG Wireless
Ethernet Marvell Yukon 88E8040 PCI-E Fast Ethernet
Bluetooth Adapter USB Based Generic
Webcam USB Based Namuga 1.3M
Installation is remarkably easy.
You’ll need the following things – an External USB DVD drive, and Snow Leopard.
Suggest before you install anything, update your BIOS to the latest version. This should be something like BIOS version 06BA or newer.
The bios updates are windows only, so you’ll need to do that before installing OSX, or have some other method of booting into Windows afterwards (google for Hiren Boot CD 10 for something that will provide a bootable Windows XP amongst other tools).
There are two bios files that are available currently. This first one is the one that you will likely have to use:
http://downloadcenter.samsung.com/content/FM/201002/20100203094911375/Win_N310_06BA.exe
And here is the second one:
http://downloadcenter.samsung.com/content/FM/201003/20100302094206890/Win_N310_01BD.exe
CHECK YOUR VERSION OF YOUR BIOS IN YOUR BIOS. IF YOUR VERSION ENDS IN A “BA”, USE THE FIRST ONE. IF IT ENDS IN “BD”, USE THE SECOND ONE.
Ready?
Download the latest NetbookInstaller ISO from here – http://osx.mechdrew.com/downloads/
Burn to CD. Connect your USB drive to the N310, and boot off of the newly burned CD.
Follow the instructions to swap with your Snow Leopard DVD at the appropriate time, and boot into the installer.
Install as normal (in my case, I just wiped the existing partitions, set the boot type to GUID instead of MBR in Partition, Options, and did a full install)
Once the OS reboots (or finishes with a cannot install error right at the end – don’t worry, its not a problem!).
Reboot into the NetbookInstaller ISO again, but this time choose the HDD (as we still need to install a valid bootsector for the OS to run)
The OS should boot up ok, fill in the relevant bits and pieces, and get to the desktop screen.
Open up NetBookMaker from the CD, navigate to the Tools folder and open NetbookInstaller:
I did this using 0.8.3RC4, but newer versions should be similar. Current version is 0.84rc1 as of April 2010.
Click Continue for the Unrecognized Hardware Prompt.
Choose the correct disk in the Volume Dropdown, and
Check Install Chameleon 2
Check Install General Extensions
Check Generate a System Specific DSDT.AML file.
Uncheck everything else.
Click Install.
It should trundle away for a few minutes, then recommend you reboot.
Remove the NetbookInstaller DVD, and make sure that you can reboot ok from the Hard Drive
Right now you should have working Webcam, Video, Bluetooth, and Trackpad will support 2 finger scroll (go to System / Preferences/ Trackpad to configure)
We’re still missing Wifi, Audio, and you’ll notice that sleep doesn’t quite work yet.
To install those, we’ll need to set some BIOS parameters, and replace the wifi card.
Wifi – the original card is a crap atheros. I couldn’t be buggered looking for drivers, and immediately swapped it out for a Dell1390 Broadcom card. Cheap, and the same as real Macbooks, so no driver issues. Should be about $8 on eBay (RMB50 or so locally in China on Taobao).
The N310 is reasonably easy to disassemble, just remove all the plastic plugs underneath (including the larger feet ones), and remove the screws. Gently remove the case bottom, and replace the wifi card.
If you use the Dell1390 you won’t need to install any drivers, they’re built in, yay!
Enabling Sleep / Brightness (working on 10.6.3 / BIOS 06BA apparently ) –
Go into the BIOS and set the following:
EDB = Enabled
Legacy USB Support: Disabled
USB S3 Wake-Up = Enabled
Boot into OSX
You’ll need to replace the DSDT.aml from NetbookMaker with the one below.
I’ve uploaded a DSDT.aml for the n310 here – DSDT.aml.
To use, rename file to DSDT.aml, and copy to /Extra, then reboot.
This also apparently works for Brightness control with the latest BIOS revision on 10.6.3. You’ll have to change brightness from the System Prefs / Displays / Brightness though, as the function keys aren’t mapped.
Note: If you do mess around with DSDT.aml files, please have a working recovery method available that you can access the hard drive with (eg an OSX Install DVD + Boot132 CD). Apple’s install DVD can also be used for recovery.
If you find that you can’t boot after installing the DSDT.aml, boot from the Boot132 CD or USB, then boot into to the OSX install DVD. Go to terminal in the installer, and delete the offending file, then reboot.
For the remaining drivers:
Download the zip below for modified Bluetooth (to enable bluetooth on / off keyboard switch), and 10.6.3 compatible Audio drivers (kexts) for the N310.
Thanks to Breathless for modifying the Bluetooth, and emailing me both files.
Samsung N310 Audio and Bluetooth Kexts
Copy to /Extras/GeneralExtensions, then rebuild the Extension cache.
You can do that manually or use a tool. NetbookInstaller nicely places a program called UpdateExtra into the /Extra folder which can rebuild the Extension cache for you. Reboot once done, and you should be good.
Thats pretty much it!
—-
Now you should have a fully working Samsung N310 running OSX Snow Leopard!
The brightness (via Displays System Prefs panel), sleep, audio and bluetooth should all be working fine. The wifi too (assuming you replaced the mini pci-e card as recommended)
The volume on/off keyboard functions should work, the trackpad on/off.
Thanks to Breathless for the feedback so I could update this page.
Good luck with yours!
Useful links:
http://www.kexts.com – kexts (drivers) for OSX
http://www.superhai.com/darwin.html – Power related drivers for OSX
http://osx.mechdrew.com/ – MechDrew from MyDellMini’s site on Hackintosh Installs
http://cid-8b65993ef55cf014.skydrive.live.com/browse.aspx/.Public/OSx86/Snow%20Leopard – some Czech site hosted on live.com full of goodies/ kexts
7
Another outage!
Seems that when it rains, it pours.
The gods were not content to give us only one issue today from an external provider, but two!
At approximately 7pm the network that includes our mail server was on got hit by a massive denial of service attack.
The nice people at Shanghai Telecom decided that they would simply shut off routing for the entire subnet as their optimal solution.
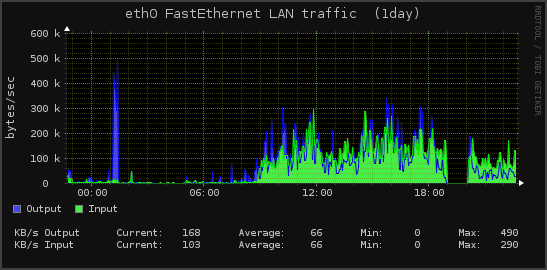
We have a nice graph of that happening here:
Note the sudden precipitous drop in network traffic starting at approximately 7pm, which lasted until approximately 8pm.
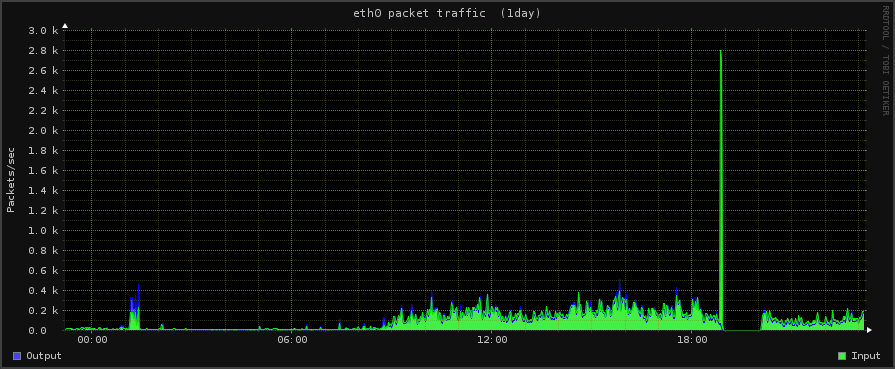
We also have images of the DoS attack [although not completely, as our network was null routed (shut off) for the brunt of the attack]
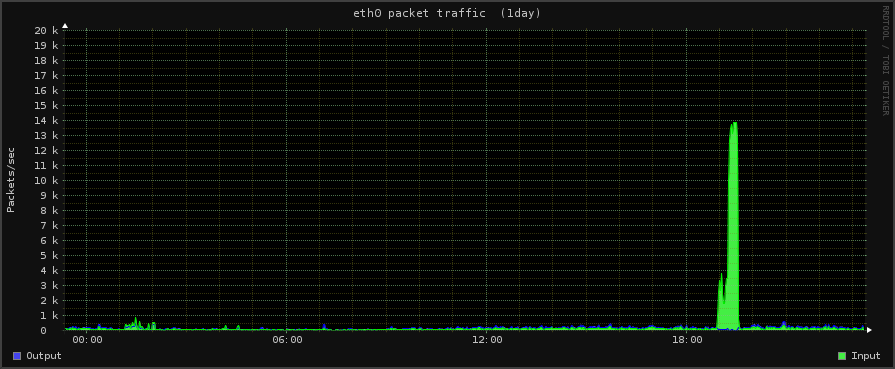
You can see the sudden increase in incoming traffic in this image below (which occurred before they killed the network completely).
The green line which indicates incoming packets suddenly goes sky high before the network people shut off the network.
Some of the other servers also got hit by this – notable our web servers, although they didn’t cut those off thankfully.
See below for a view of that traffic.
As the old curse goes – may you live in interesting times.
Some days are more interesting than others!
Setting up OpenVPN was a real PIA for a number of reasons DNS, crap documentation, and general issues with vpn clients.
My working notes are below:
Install OPENVPN from tar.gz or apt-get install…
Generate key’s etc (tons of other tutorials on that)
Prelim info
My vpn server has a static ip address, in the 66.xx range. Our local client machines use a 192.x range (typically).
I setup a tun address for 10.1.0.1 for the server.
As we don’t want to have routing issues, I set openvpn to use the 10.x range for any vpn connections.
(Essentially all clients connected to the openvpn ip will get a 10.1.0.x address).
I also force clients to use our DNS server (more on that later), as China does some DNS lookup interceptions which break stuff if you are using a tunnel. I also don’t use openvpn on the standard port 1194, as I was seeing mysterious tcp resets when using the common vpn ports. Amazing how that happens in China. Lastly, I’ve put in on port 8080 for our users, as this seems to work without issue.
To do all that, I created an openvpn.conf file with the following:
port 8080

#proto tcp

#dev tun

proto udp

dev tap

ca keys/ca.crt

cert keys/server.crt

key keys/server.key

dh keys/dh1024.pem

server 10.1.0.0 255.255.255.0

ifconfig-pool-persist ipp.txt

keepalive 10 120

comp-lzo

user nobody

group users

persist-key

persist-tun

status /var/log/openvpn-status.log

verb 3

client-to-client

push "redirect-gateway"

push "dhcp-option DNS 10.1.0.1"

link-mtu 1456

mssfix 1412

cipher AES-256-CBC
(You can read the standard install stuff for your own key generation)
Next we need to tell our server to route stuff appropriately for vpn traffic
echo 1 > /proc/sys/net/ipv4/ip_forward

iptables -A INPUT -p udp --dport 8080 -j ACCEPT

iptables -A INPUT -i tun+ -j ACCEPT

iptables -A FORWARD -i tun+ -j ACCEPT

iptables -A INPUT -i tap+ -j ACCEPT

iptables -A FORWARD -i tap+ -j ACCEPT

iptables -t nat -A POSTROUTING -s  10.1.0.0/24 -o eth0 -j MASQUERADE
(You’ll need to change the 10.1.0.0 to your actual vpn user subnet if you change in the openvpn.conf)
OpenVPN should start, and be connectable.
My client config looks approximately something like this:
client

dev tap

proto udp

remote mysupersekritvpnserver.com 8080

comp-lzo

verb 3

mute 20

nobind

persist-key

persist-tun

cipher AES-256-CBC

ca ca.crt

cert my.crt

key my.key
my.crt, my.key, ca.crt should be copied / generated from the server, and copied over to the client machine.
mysupersekritvpnserver.com should be changed to your server name.
We use Mac’s mostly, so we use tunnelblick, copy that config in, check the “Set NameServer” box in Details.
You should be able to connect now and ping remotely with that.
Next, we need to setup DNS
For the longest time I couldn’t get this working, despite me reading and re-reading the doc’s.
We use dnscache for dns lookups on our servers. DNS Cache allegedly allows lookups from other ip addresses by sticking whats allowed into /etc/dnscache/root/ip
This wasn’t working at all.
Eventually I twigged that dnscache binds to one ip address, and ignores the others, which is why local lookups worked, but tunnel started ones didn’t.
Took me a while to see that though. Was only when I did an nmap 10.1.0.1 and saw port 53 was closed, that I realised, despite the misleading fscking documentation which says “just add the ip address for the computers allowed to connect” to the dnscachefolder/root/ip, you really need to bind it to all the ports you will want lookups to work for.
- Which is not clearly mentioned in any documentation I saw on the net.
I ended up making another dnscache specifically for our tun address on 10.1.0.1, and telling it to allow queries from the actual server ip 66.x, and from 10.x, *then* it started working.
Hours of fun and joy.
Worth it though, I can now connect to bookface and toobyou, yay!
Archives
- November 2024
- November 2019
- October 2019
- August 2019
- April 2019
- February 2017
- September 2016
- June 2016
- May 2016
- September 2015
- August 2015
- June 2015
- April 2015
- December 2014
- October 2014
- September 2014
- July 2014
- June 2014
- April 2014
- October 2013
- July 2013
- May 2013
- April 2013
- March 2013
- January 2013
- December 2012
- October 2012
- August 2012
- July 2012
- June 2012
- May 2012
- April 2012
- March 2012
- December 2011
- November 2011
- October 2011
- September 2011
- July 2011
- May 2011
- April 2011
- March 2011
- February 2011
- January 2011
- December 2010
- November 2010
- October 2010
- September 2010
- August 2010
- July 2010
- June 2010
- May 2010
- April 2010
- March 2010
- February 2010
- January 2010
- December 2009
- November 2009
- October 2009
- May 2009
- April 2009
- March 2009
- February 2009
- January 2009
- December 2008
- November 2008
- October 2008
- September 2008
Categories
- Apple
- Arcade Machines
- Badges
- BMW
- China Related
- Cool Hunting
- Exploits
- Firmware
- Food
- General Talk
- government
- IP Cam
- iPhone
- Lasers
- legislation
- MODx
- MySQL
- notice
- qmail
- requirements
- Reviews
- Service Issues
- Tao Bao
- Technical Mumbo Jumbo
- Things that will get me censored
- Travel
- Uncategorized
- Useful Info

